My-Tiny.Net :: Networking with Virtual Machines
Securing Communications with SSL/TLS
All of the applications on our system use plaintext passwords, which can be seen with a packet sniffer like tcpflow (see Utilities on the menu). That's bad, so now we will add a layer of security by encrypting our communications.

Postfix, Dovecot, openLDAP and PHP can all be configured to encrypt the messages they send using SSL/TLS, but Monkey is not. That gives us a great reason to do something easy (ho ho) - use a single mechanism for all of these services rather than configuring each one individually. To do this we use stunnel and the concept of port forwarding.
Tunnelling is the process of placing an entire packet within another packet before it is transported over the Internet. That outer packet protects the contents from public view and ensures that the packet moves within a "virtual tunnel". This layering of packets is called encapsulation.
On the sending side, stunnel takes every packet it receives and encapsulates it in an encrypted SSH packet. Routers along the way do not look at the payload (the inner packet); they only check the outer IP packet as they forward it toward the tunnel endpoint. At the destination, stunnel removes the encryption and the original packet is passed up to the application. This whole process is completely transparent to the client and server applications.
SSL Concepts and Terms
Before going further, let's clear up a point of potential confusion. The encryption scheme we use has two names: SSL and TLS. SSL stands for Secure Sockets Layer, which was invented and popularised by Netscape. When people decided to make SSL an Internet standard, the IETF renamed it to Transport Layer Security (TLS). It's really just important to recognise that SSL and TLS refer to the same thing - the libraries we use are called openSSL, so we will use SSL here.We are not going to cover the basics in any detail here - there are plenty of sources to help you get familiar with these terms:
- certificate authority
- self-signed certificate
- certificate management
- client certificate
- server certificate
- certificate file
- key file
- CAfile
Recommended Reading: https://hpbn.co/transport-layer-security-tls/
Chapter 4 in High Performance Browser Networking by Ilya Grigorik (Chapters 1-3 and 5-8 are also particularly interesting!)
stunnel
There are comments in the configuration files about how stunnel uses certificates:;---%<--------------------------------------------------------------- ; A certificate chain PEM file is always needed in server mode. ; We use the same cert for everything, with no internal verification ;---%<--------------------------------------------------------------- cert = /etc/stunnel/Site_Cert.pemThe file Site_Cert.pem contains the key (private data) and certificate (public data). In order for stunnel to start automatically, the key is created without a password. This means anyone who can read this file can compromise your SSL security. This file must be readable only by the system account that runs stunnel.
In stunnel, certificate+key is required in server mode and optional in client mode. We don't do client verification for our internal servers, and use pem format for the certificate to make the configuration simpler:
; since private key and certificate are in one file, we don't need
; to specify the key file. Since we do not use authentication with
; client certs, we don't need the CA certificate for verification.
;key = /home/stunnel/etc/stunnel/stunnel-privkey.pem
;CAfile = /home/stunnel/etc/stunnel/cacert.pem
Creating a PKI chain of certificates is not too difficult. The OpenVPN FAQ has a good hands-on explanation - see the links in SSL and SSH :: OpenVPN on the menu.
Another helpful reference is the OpenSSL Certificate Cheat Sheet
at https://www.jamescoyle.net/category/cheat-sheets.
To get away from the command line, xca from http://xca.hohnstaedt.de/xca/index.php/download
has a nice YouTube tutorial to get you started with creating self-signed certificates.
- stunnel prefers the export format pem+key
- for OpenVPN, to get separate files to put [inline] in the client configuration file use
PEM private for the private key and
PEM (*.crt) for the signed certificate.
Port Forwarding
The concept of port forwarding is quite simple: our application listens on one port, and when it receives a message simply changes the port number in the TCP header and sends it on again. stunnel does the extra step of encrypting or un-encrypting the data in the TCP packet before it is sent on. The way we use stunnel, the server and client don't even know that the data is being encrypted!To make this work, the first thing we need to do is figure out what ports we want to use. It is usually better to go with the standard ports, which as we know are listed in /etc/services. Rather than having everyone search through the 2090 lines of assignments there, open the Port List page under Quick Reference on the menu in a new tab to see a list of relevant ports.
Looking at the list, two things should be obvious: there are standard ports for encrypted and unencrypted communication, and the naming scheme is very simple.
Our port forwarding scheme is also very simple. We just need to configure the listening (accept) port and the forwarding (connect) port for each service, depending on the role as a client or server. The table below shows how the WebServer as a client uses stunnel to communicate with the other servers:
So, to check our mail [imaps], the request is received by the client-side stunnel on port 143, stunnel does the encryption, and then sends it off to the MailServer. The server-side stunnel receives the request on port 993, unencrypts it, and passes it to Dovecot via port 143. Responses work the same way, in reverse. The same scenario unfolds when we do an addressbook lookup [ldaps] and when we send mail [smtps].
WebServer MailHost LDAPhost Gateway
The best part is that the configuration changes are minimal - the servers just need to be configured to communicate with their local stunnel rather than communicating directly.
Setting up stunnel
To kickstart the setup, the configuration scripts installed appropriate stunnel configuration files (how nice was that!) in /etc/stunnel and the startup script rc.stunnel.Note that we do not have to change any of the server configuration files, only the clients who are generating requests - the servers will see 127.0.0.1 as the source address, and send the responses there.
Doublecheck that your VirtualBox host-only interface in Windows is on the same subnet as the WebServer VM and that VirtualBox DHCP is OFF; get all four of your VMs running; then make sure mail can be delivered and that PLA can use the LDAP server (see the previous lab exercises).
On the WebServer
- Get to /var/www/squirrelmail/config/
- Swap the comments (add or delete the # at the beginning of the line) in
svr_adrs.php so it will use localhost for
$smtpServerAddress
and $imapServerAddress rather than the other servers
- Edit svr_ldap.php
so squirrelmail will use localhost rather than the LDAP server:
// First LDAP server bla bla bla ... $ldap_server[0] = Array( 'host' => 'localhost', 'name' => 'ldap o=tinynet.edu', 'base' => 'o=tinynet.edu' ); - Move to /var/www/ldapadmin/config/ and edit config.php:
find ( [F7] ) the
/* ## Host to connect to ## */ directives, and
swap the comments so PLA will use 127.0.0.1 rather than the LDAP server.
- Change the hosts directive in /etc/dovecot/ldap-dn_o.dbconf to use localhost rather than the LDAP server.
- Check the configuration files to find out where stunnel will log messages,
and how to put stunnel in debug mode
- Find out which file in /etc/rc.d/ will start stunnel automatically at boot time:
rc.M, rc.inet2, rc.local ?
- On all of the servers, make the startup file executable, start stunnel at the command prompt,
and verify that it is working usingnetstat -tulpand the logfiles.
| Our servers will still respond to plaintext requests; to be completely secure we need to add iptables rules that will drop requests directed to the server ports that have a source address other than 127.0.0.1 - For this step, see Packet Filters :: Firewalls on the menu. |
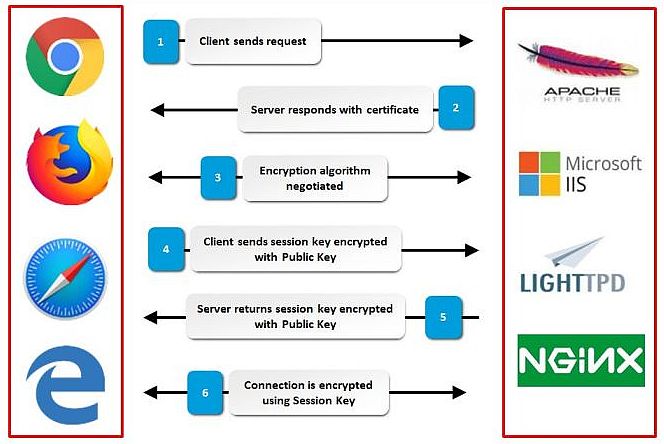
Connecting with your host browser
HTTP doesn't have a method for negotiating SSL over a plain HTTP connection; you must use https:// in the URL to signal the server that the client (browser) wants to initiate a secure connection.In the interests of providing higher security for the Web, the IETF deprecated (prohibited) SSL 2.0 in 2011 with RFC 6176, and SSL 3.0 in 2015 with RFC 7568, so behind the scenes everything now uses TLS.
Since the release of Google Chrome 58 (2017-04-19) all browsers have been tightening their criteria for certificates. This means that while a simple self-signed certificate is fine for encryption, we need a different certificate to make a trusted connection with browsers - there is a good discussion of trust vs. security here at security.stackexchange.com
In practice, "Subject Alternate Name" is a required field for Chrome to trust a certificate and create a secure (https://) connection using a URL with an IP address instead of a domain name.
The TinyNet solution is to create a virtual ethernet interface for the webserver (see Linux Notes::Virtual ethif on the menu), and a CA certificate that can be imported into the browser's list of trusted sites.
/etc/rc.d/rc.inet1 on the webserver creates a virtual ethernet interface with an IP that matches the one in the TinyNetCA certificate, so once the certificate is installed in the Trusted Root CA store for the host system browser we can access the secured site with the URL
https://192.168.56.252/
The default index.html for monkey on the webserver has a link to download the TinyNetCA certificate as a zip file - just extract the certificate file and install it to the operating system Trusted Root Certificate Store.
- Chrome on Windows is easy: use the "3 dots" to select Settings, choose
Privacy and Security, then Security, then scroll down and choose Manage Certificates. Choose the Trusted Root Certification Authorities tab, and click the Import button. Browse to where you stored the
TinynetCA.crt you extracted from the zip file, and click Open.
(there is a rumor from late 2020 that this will be changing, but no timeline) - Edge cannot manage certificates directly, you have to follow the proper way to do this in Windows 10 ("Home Edition" takes extra steps)
- Mac users should check this link or this link
We use stunnel because it is such a simple tool: to see how it stacks up against some alternatives, the SecureComms page under Documentation on the menu provides a comparison of securing network communications with stunnel, 0penSSH, and OpenVPN. A clever way to use stunnel and OpenVPN together to avoid "deep packet inspection" is described in detail at https://www.raspberrypi.org/forums/viewtopic.php?t=40389
RedHat 9 Reference Guide
11.5. Mail User Agents p.163-4 [make certs]

18. SSH Protocol
18.1. Features of SSH
18.2. SSH Protocol Versions
18.3. Event Sequence of an SSH Connection
18.4. OpenSSH Configuration Files
18.5. More Than a Secure Shell
18.6. Requiring SSH for Remote Connections